Send multiple follow-up emails using the same email thread
You asked and we listened. A lot of our customers are looking for ways to send multiple follow-ups. However, Mergo allows only one follow-up per campaign. We understand that just one follow-up may not be enough for some users. That is why we are pleased to share a method allowing you to send multiple emails that behaves like a regular follow-up - but better and more manageable! All these are possible thanks to our Send as reply and Schedule Delivery features.
In this article
How does it work?
- First, we send the original campaign.
- Then a separate email draft (that serves as your follow-up email) is sent using our Send as reply feature, but this will behave as though you are replying to the original email you initially sent.
- This “follow-up” is automatically sent as a scheduled campaign.
Configuring multiple follow-up campaigns is a breeze! So easy that you can finish everything in as little as 5 minutes. And once configured, you can forget all about it since Mergo will automatically send your campaigns based on your specified date & time.
☝️Drafts and supplementary materials should be prepared in advance to guarantee a smooth process.
If you would like to learn more, then this tutorial is for you. We hope this new workflow helps you get the most out of Mergo.
Info: Want to send a simple follow-up email instead? Then follow this tutorial.
Send as reply and Schedule Delivery are premium features.
Note: It is crucial that you carefully follow the order of the instructions to guarantee a problem-free setup for this workflow.
Applications
This workflow can be very useful in marketing, universities, customer onboarding, networking events, corporate communications, recruitment, and project teams, to name a few.
Our Hypothetical Use Case
We will conduct a virtual training for registered participants.
Five days before the virtual training, we will send a confirmation email to all participants. [📗 Confirmation sheet/tab]
Then a scheduled follow-up (reminder email) will be sent to the participants 2 days before the virtual training. [📗 Reminder sheet/tab]
A week after, the participants will receive congratulatory emails with personalized certificates (attachments). [📗 Certificates sheet/tab]
Finally, emails with a link to the training feedback form will be sent a day after. [📗 Feedback sheet/tab]

And here is the final product of our scheduled follow-up campaign (using just 1 email thread). Behaving like a follow-up, but better!

Recapping, our virtual training campaign has:
- 1 original email (Confirmation)
- 3 scheduled follow-ups (Reminder, Certificates, and Feedback)
- Our Send as reply and Schedule Delivery features help us achieve the task of sending multiple follow-ups seamlessly.
Let us now begin our scheduled follow-up campaign.
Step-by-step tutorial
Send your original campaign
Use Mergo to send your 1st campaign. Learn how.

Screenshots showing our campaign sheet (left) and the resulting email campaign to one of the participants (right).
Replicate the original campaign sheet multiple times
Create duplicates - as many as needed for your scheduled follow-ups.
In our example, we replicated our original campaign sheet 3 times - with a total of 4 sheets/tabs.

Note: Ensure to retain the entire Merge status column of the original campaign sheet (with its entries) when duplicating.
Rename the duplicated sheets for easy tracking
In our use case, we renamed our sheets/tabs Reminder, Certificates, and Feedback.
Refresh the Mergo sidebar

☝️ If have followed this walkthrough tutorial since the beginning, you will notice that the Mergo UI (sidebar) is still referencing your original campaign sheet.
Note: Refreshing is a critical step - notably if you left the Mergo sidebar open since you first sent your original campaign (in Step 1).
Refreshing ensures that Mergo will reference the correct campaign sheet. Chances are, your Mergo UI (sidebar) has been open since you sent your original email campaign. And it is still open up to now - even though you’re viewing your duplicated sheet currently.
Select the relevant Gmail draft
Choose the appropriate draft from the dropdown menu (the one that will serve as your scheduled follow-up).
In our example, we chose 🖥️ Virtual Training: 2 days to go before our Google Apps Automation!

Note: Remember the email Subject of the draft we used here (🖥️ Virtual Training: 2 days to go before our Google Apps Automation!). Compare this to the email Subject that will be used when this campaign is sent later in Step 10 (🖥️ Virtual Training: Google Apps Automation).
(Optional) Configure other essential Mergo features
Depending on the specific setup of your campaign sheets, you may need to change the Sender Name, or include personalized images, attachments, links, …
In our Use Case example:
On the Certificates tab/sheet), we added 4 columns to include personalized attachments (by specifying the certificate file names) and images to display their accomplishment badges.
📌 The use of attachments and images will not be explained in this tutorial. Please follow the detailed tutorials below to learn how to:

Reset the Merge status column
To do this, delete the entire Merge status column.

Enable Send as reply

When you click the Send as reply slider, it will automatically append this campaign to the original email you sent in Step 1 (using the original email’s Subject, as well).
Info: There will be instances where you do not want to append an email campaign using the Send as reply feature (like when sending a unique campaign).
In our Certificates campaign sheet example, you may choose to:
- Append it to the original campaign by using the Send as reply feature
- Or opt to send it as a standalone/unique campaign (and use the default Subject of the Certificates email)
Schedule the delivery of your follow-up
Click the More actions > Schedule delivery.
Choose the appropriate Schedule delivery option and configure other settings as needed.
In our example, we used the following settings for our Reminder email:
- The Select hour/date option
- Picked Dec. 5, 2022
- Retained 8:00 AM as the time trigger
- No recurrence
Click SAVE for the changes to take effect.

Initialize the Scheduled campaign
Click the SCHEDULE MAIL MERGE button.
A Merge status column will be created with the status SCHEDULED for each recipient/row.
In our example, a prompt confirms that Emails will be sent starting on Monday, December 5 at 8 AM.

After clicking the SCHEDULE MAIL MERGE button, Mergo will wait until it is time to send your email campaign.
Note: Your scheduled campaign will not be sent exactly as specified.
It may have a delay of up to 1 hour. This delay is due to Google's trigger events. Learn more.
For example, if you selected Tomorrow morning 8 AM, the campaign will start sending tomorrow between 8 AM and 9 AM.
Info: The outcome of this Scheduled Mail Merge would be:
- The email campaign will use the relevant follow-up email draft you selected in Step 5.
- But the Subject line used is the same as the original campaign.
- This scheduled follow-up email is automatically sent as though you are replying to the original email. That is, the scheduled follow-up ( Reminder campaign) will append itself (be added) to the original campaign - behaving as though it was replied to using the original email. As a result, there will only be one email thread (see the resulting image on the right).

The resulting scheduled Reminder email behaves like a standard follow up
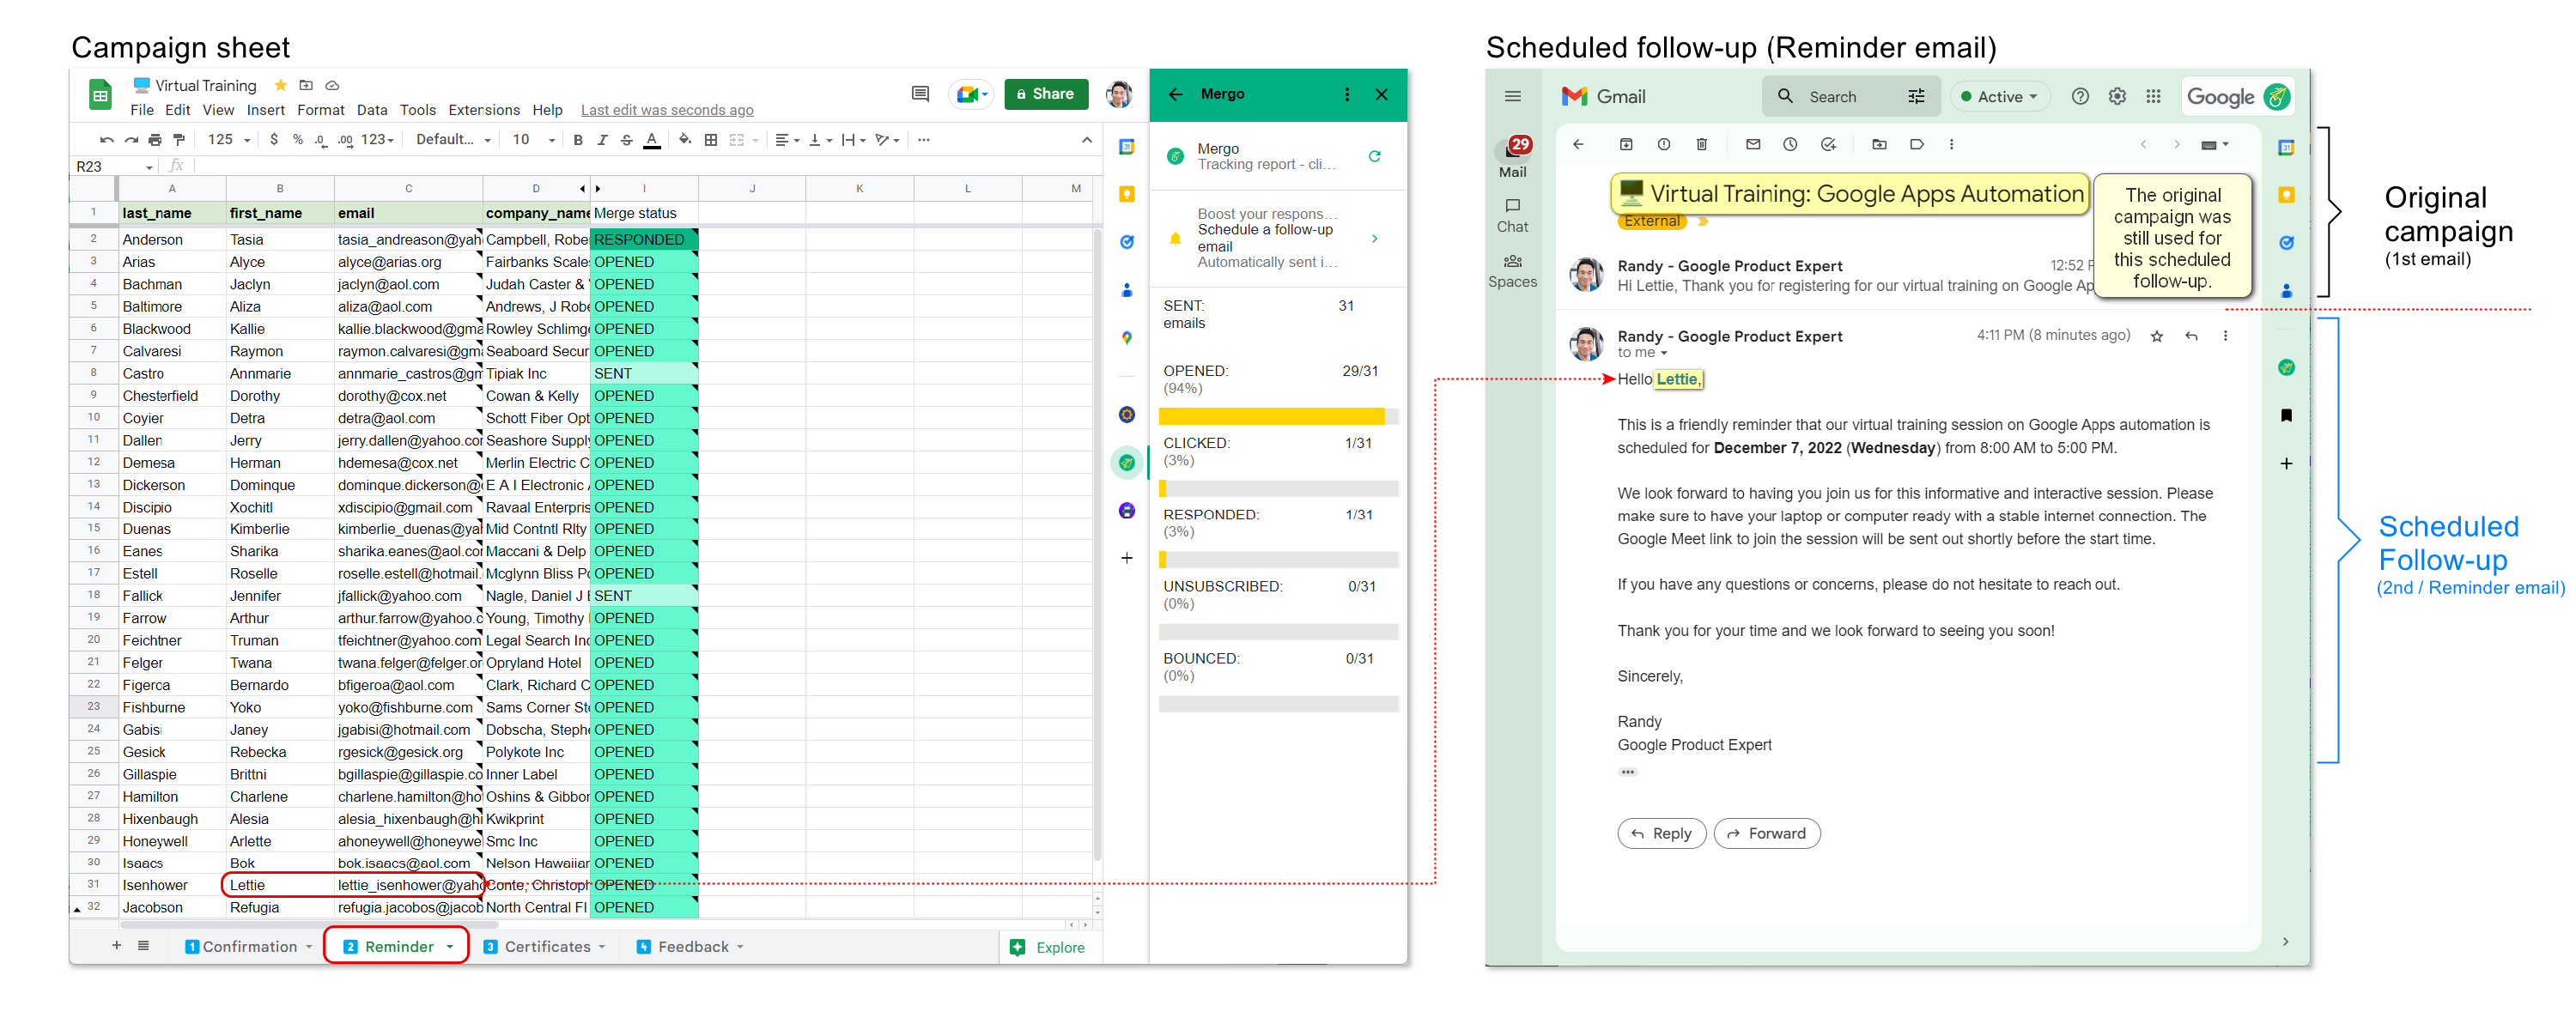
Repeat steps 4 - 10 for each Scheduled Follow-up.
Here is the final output of our hypothetical use case for the virtual training:
(See the corresponding screenshots annotated below.)
Five days before the virtual training, we sent a confirmation email to all participants. [📗 Confirmation sheet/tab]
Then a scheduled follow-up (reminder email) was sent to the participants 2 days before the virtual training. [📗 Reminder sheet/tab]
A week after, participants received congratulatory emails with personalized certificates (attachments). [📗 Certificates sheet/tab]
Finally, sent emails with a link to the training feedback form a day after sending the certificates. [📗 Feedback sheet/tab]
- 1 original email (Confirmation)
- 3 scheduled follow-ups (Reminder, Certificates, and Feedback)
(using just 1 email thread - and behaving like a follow-up, but better!)

And below is the email account used to send all 4 email campaigns (as a single email thread). The Google Sheets file used as the campaign sheet is labeled Virtual Training v1.
📌 Take note of the campaign sequence as they were sent (exactly the same sequence as the composite image of the final output above):
1️⃣Confirmation
2️⃣Reminder
3️⃣Certificates
4️⃣Feedback
